
Small Bathroom Layout Ideas for Studio Apartments: The Compact-Space Blueprint
- The 5 Rules of a Great Small Bathroom
- Step 1: Measure Your Bathroom Before Choosing a Layout
- Step 2: Choose the Right Small Bathroom Layout
- 6. The Wet-Room Layout
- Step 3: The Bathroom Door Can Change the Entire Layout
- Step 4: Put Fixtures Where They Create Flow
- Step 5: Make the Floor Look Bigger
- Step 6: Small Bathroom Storage Ideas That Do Not Steal the Floor
- Step 7: Choose the Shower Based on Your Space
- Step 8: Use Lighting to Make the Bathroom Feel Larger
- Step 9: Solve Ventilation Before You Solve Decoration
- Step 10: Do Not Ignore Bathroom Odors
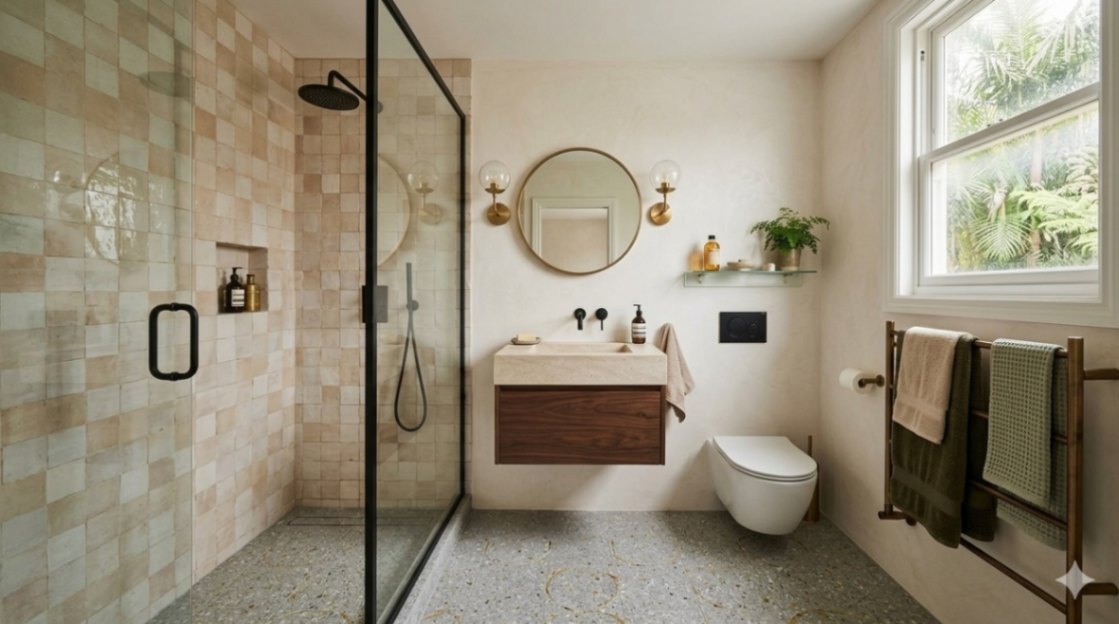
- Step 11: Choose Materials That Work in a Small Bathroom
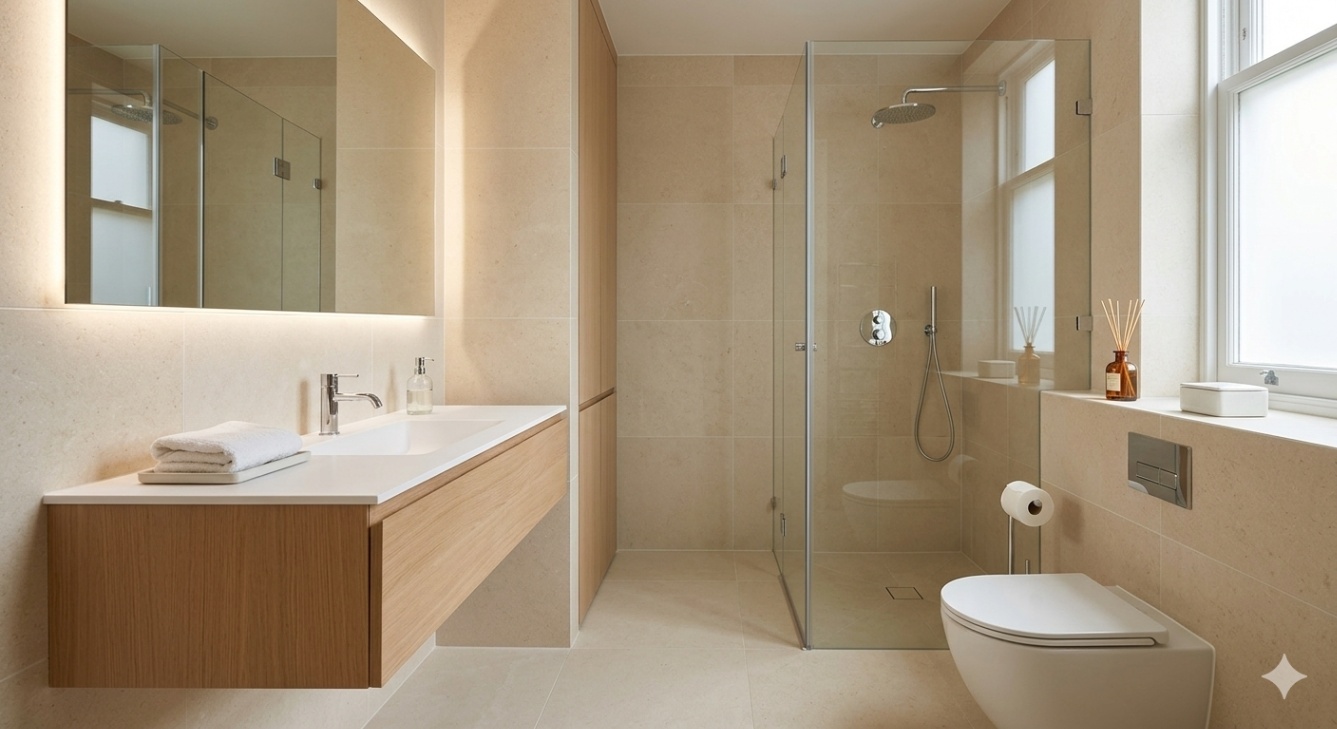
- Step 12: Make a Small Bathroom Feel More Luxurious
- Step 13: What If You Are Renting?
- Step 14: Bathroom Safety Still Comes First
- 10 Small Bathroom Mistakes That Make the Room Feel Smaller
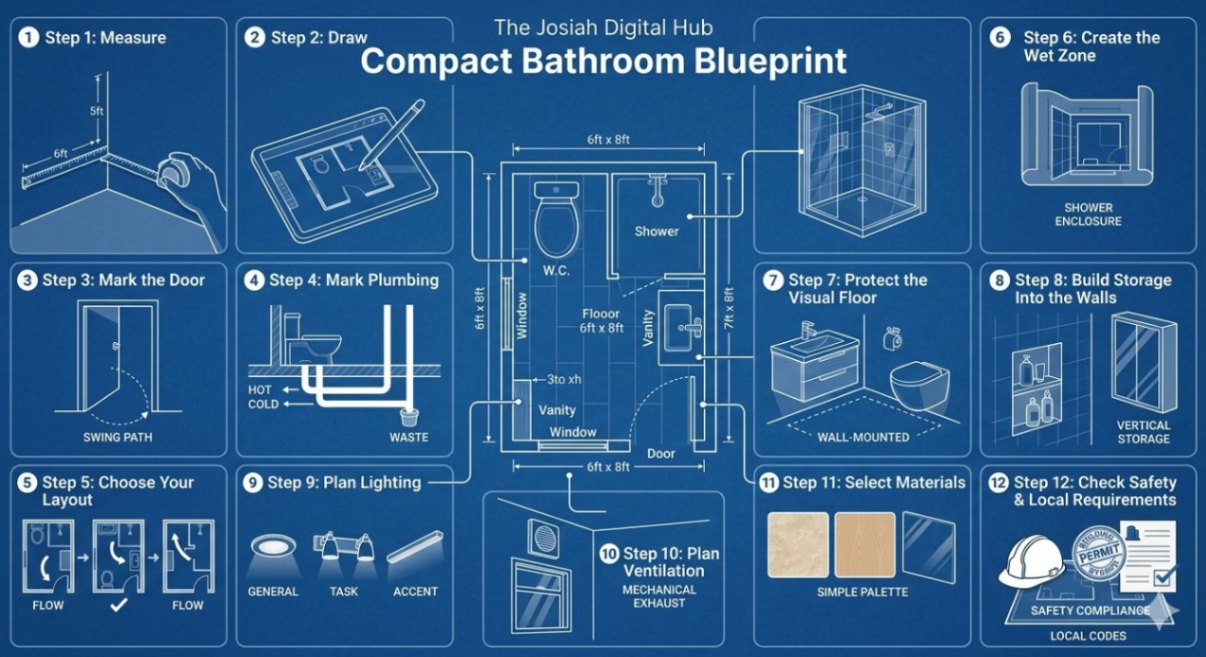
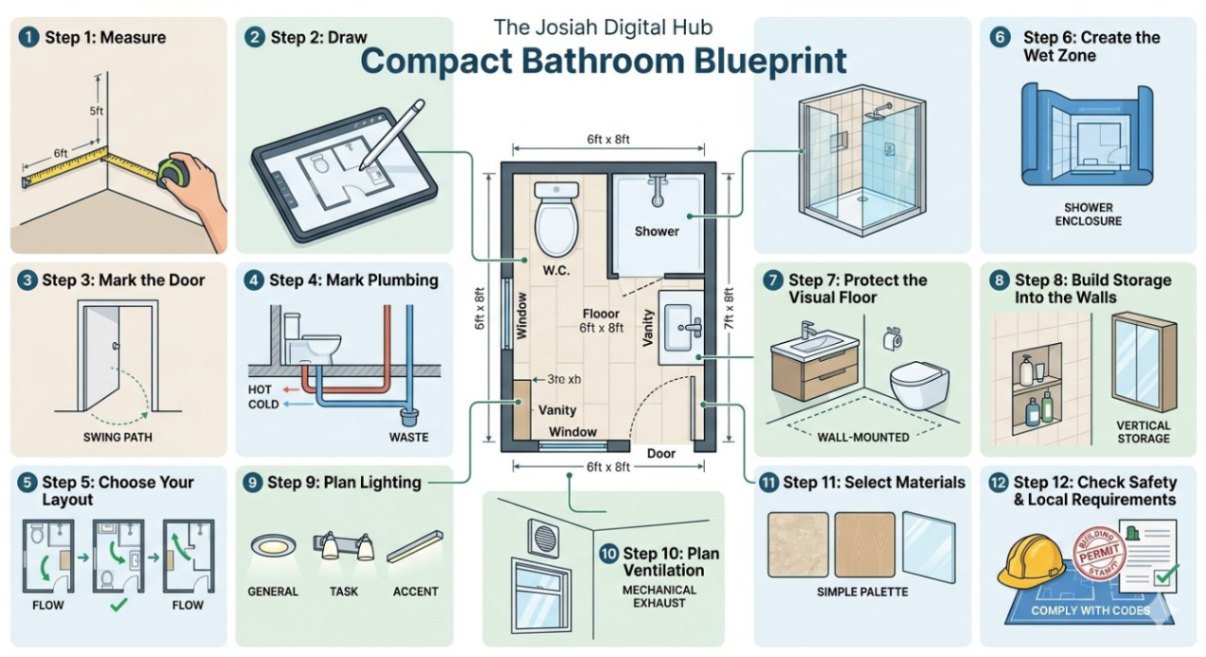
- The Josiah Digital Hub Compact Bathroom Blueprint
- Which Small Bathroom Layout Is Best for You?
-
Frequently Asked Questions About Small Bathroom Layouts
- What Is the Best Layout for a Small Bathroom?
- Is 5×8 Enough for a Small Bathroom?
- Is a Walk-In Shower Better Than a Bathtub in a Small Bathroom?
- How Can I Make My Tiny Bathroom Look Bigger?
- Should I Use a Floating Vanity?
- How Do I Add Storage to a Small Bathroom?
- How Do I Stop a Small Bathroom From Smelling?
- Can a Small Bathroom Work Without a Window?
- Can I Put a Washing Machine in a Small Bathroom?
- Final Thoughts: Small Does Not Mean Poorly Designed
A small bathroom can be one of the hardest rooms to design in a studio apartment.
You are working with limited floor space, a toilet, a shower, a sink, storage, a door, lighting, ventilation and sometimes even a washing machine. At the same time, the bathroom is connected to the rest of your home, so problems with clutter, humidity, odors or poor lighting can affect the entire studio.
The solution is not simply to make everything smaller. The real goal is to make every part of the bathroom work harder without making the room feel crowded.
In this guide, we will look at practical small bathroom layout ideas for studio apartments and compact homes. You will see different layouts, ways to position the toilet and vanity, shower ideas, storage solutions, lighting strategies, ventilation tips and simple design tricks that can make a small bathroom feel considerably more open.
Quick answer: The best small bathroom layout is usually the one that protects circulation, keeps the floor visually open, places the wet zone efficiently, uses vertical or recessed storage and maintains good ventilation. The exact arrangement depends on your room dimensions, door position, plumbing and local building requirements.
If you are also planning the kitchen in your studio apartment, explore our guide to small kitchen layouts for studio apartments for practical ideas on making the most of limited space, improving movement and creating a more functional kitchen.
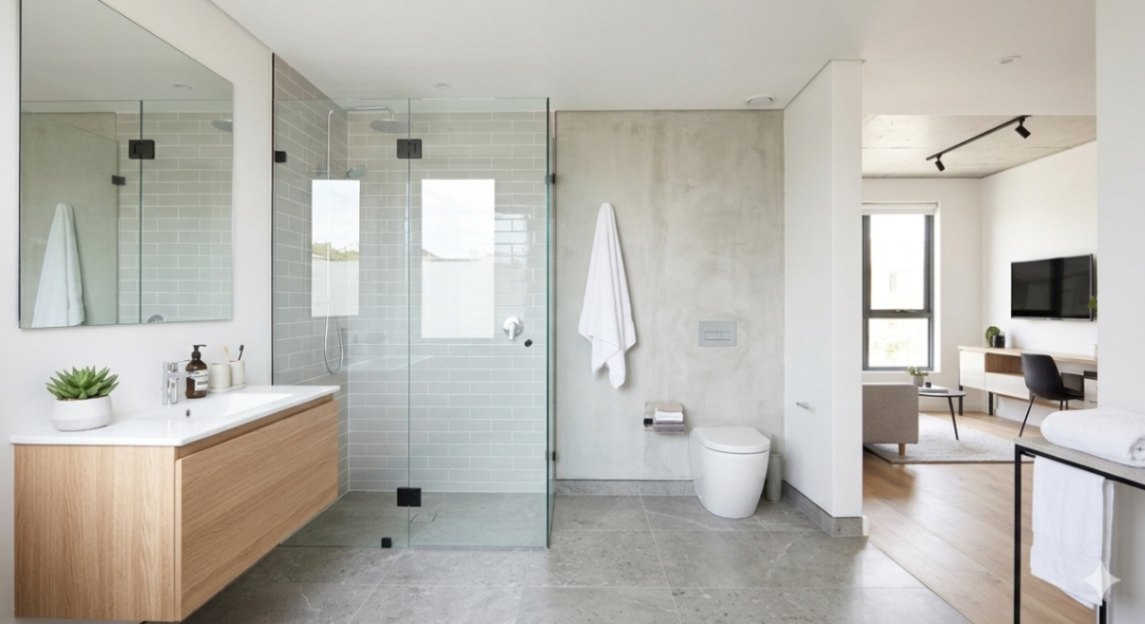
When exploring Small Bathroom Layout Ideas for Studio Apartments, the most useful approach is to start with the way the room needs to function rather than with a particular style or product. A compact bathroom has to accommodate movement, fixtures, storage and ventilation within a limited footprint. Once those practical needs are understood, design choices become much easier to make.
The 5 Rules of a Great Small Bathroom
1. Plan circulation before decoration
A beautiful vanity is useless if you cannot comfortably move around it. First decide how someone enters, turns, uses the toilet, reaches the sink and enters the shower.
2. Keep the floor visually open
The more floor you can see, the less visually crowded the bathroom tends to feel. This is one reason floating vanities and wall-mounted fixtures are popular in compact bathrooms
3. Keep the eye moving
Large mirrors, clear shower glass and similar colors across walls and floors can reduce visual interruptions. Instead of creating many separate visual blocks, aim for continuity.
4. Move storage upward or into the wall
When floor space is limited, walls become valuable storage space. Think about recessed niches, mirrored cabinets, tall cabinets and vanity drawers before adding another floor-standing cabinet.
5. Treat ventilation as part of the design
A small bathroom produces moisture quickly. The U.S. Environmental Protection Agency(EPA) notes that showers add moisture to indoor air and that inadequate ventilation can allow humidity to remain high, increasing the risk of mold and other moisture-related problems. This matters even more in a studio apartment because the bathroom is close to your living and sleeping areas.
These five checks provide the foundation for Small Bathroom Layout Ideas for Studio Apartments because they help you judge whether a layout will work beyond the drawing. A bathroom may look attractive on paper, but the arrangement also needs to provide a comfortable path through the room, control water effectively, provide practical storage and support good airflow. With those basics in place, you can compare different layouts with a much clearer idea of what will work for your space.
Step 1: Measure Your Bathroom Before Choosing a Layout
Do not start with tiles. Do not start with a vanity. And do not start by buying a beautiful shower enclosure. Start with measurements.
Measure:
• Overall bathroom length
• Overall bathroom width
• Ceiling height
• Door width
• Door swing
• Window position
• Existing plumbing points
• Drain locations
• Shower position
• Toilet position
• Vanity position
• Radiator or towel rail position
• Electrical outlets and switches
• Ventilation opening or exhaust fan
• Any structural walls or columns
Then draw the room from above. You do not need professional architectural software. A simple drawing on paper is enough for the first stage.
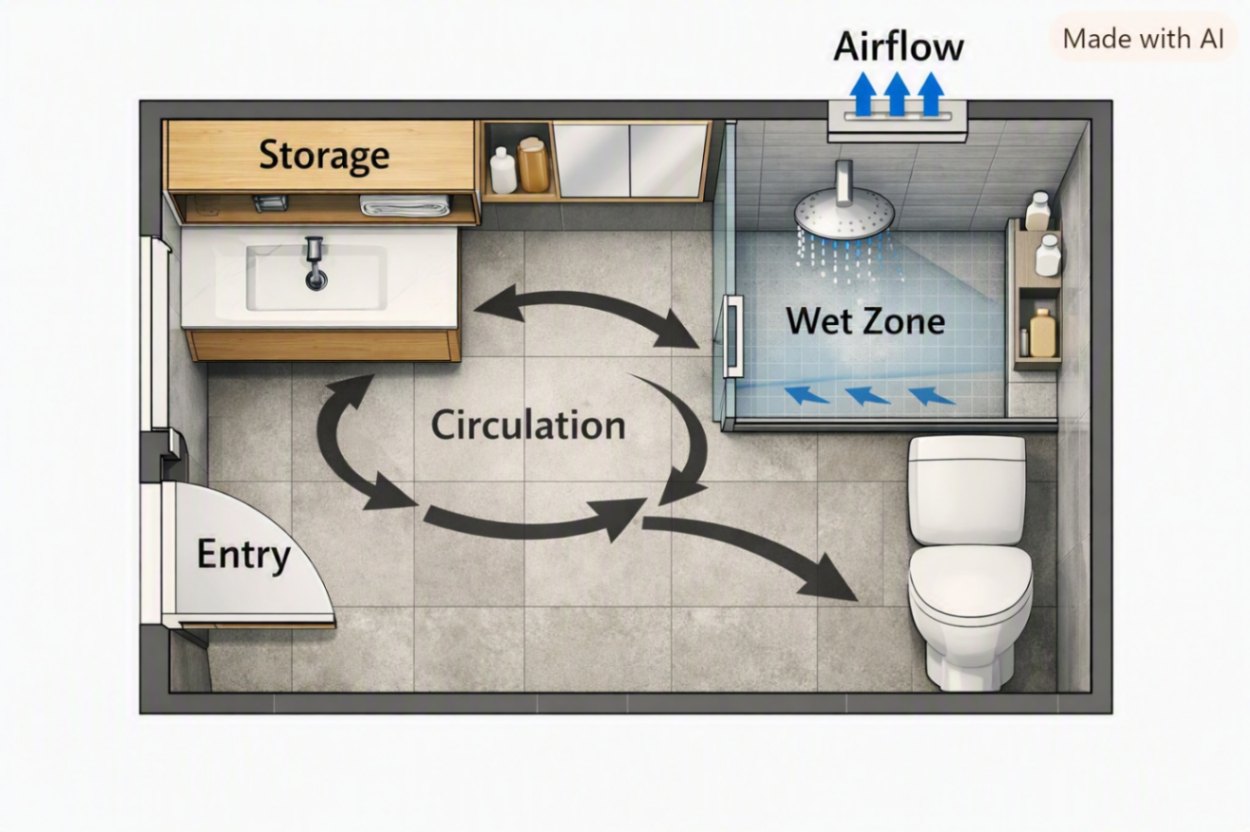
The Josiah Digital Hub 5-Point Compact Bathroom Check
Entry
Where does the door open?
Circulation
Where will your body move when entering and using the bathroom?
Wet zone
Where will water from the shower go?
Storage
Where will towels, toiletries, cleaning supplies and other items live?
Airflow
Where will humid air leave the room?
If a proposed layout looks beautiful but fails one of these five checks, it needs another look.
Step 2: Choose the Right Small Bathroom Layout
There is no single perfect small bathroom layout. A 5×8 bathroom behaves differently from a narrow 4×8 bathroom, and a square bathroom gives you different possibilities again. Here are some of the most useful layouts to consider.
1. The 5×8 Linear Bathroom Layout
The 5×8-foot bathroom is a useful example because it provides enough space for several common arrangements while still being compact. A simple linear arrangement can place the fixtures along one or both long walls.
For example:
Entry → vanity → toilet → shower
Best for:
• Small apartments
• Studio bathrooms
• Renovations where plumbing already follows one wall
• Bathrooms where simplicity is more important than adding many fixtures
Why it works:
The fixtures follow a logical sequence instead of competing for the same area. You can also create a stronger visual line by using similar finishes throughout the bathroom.
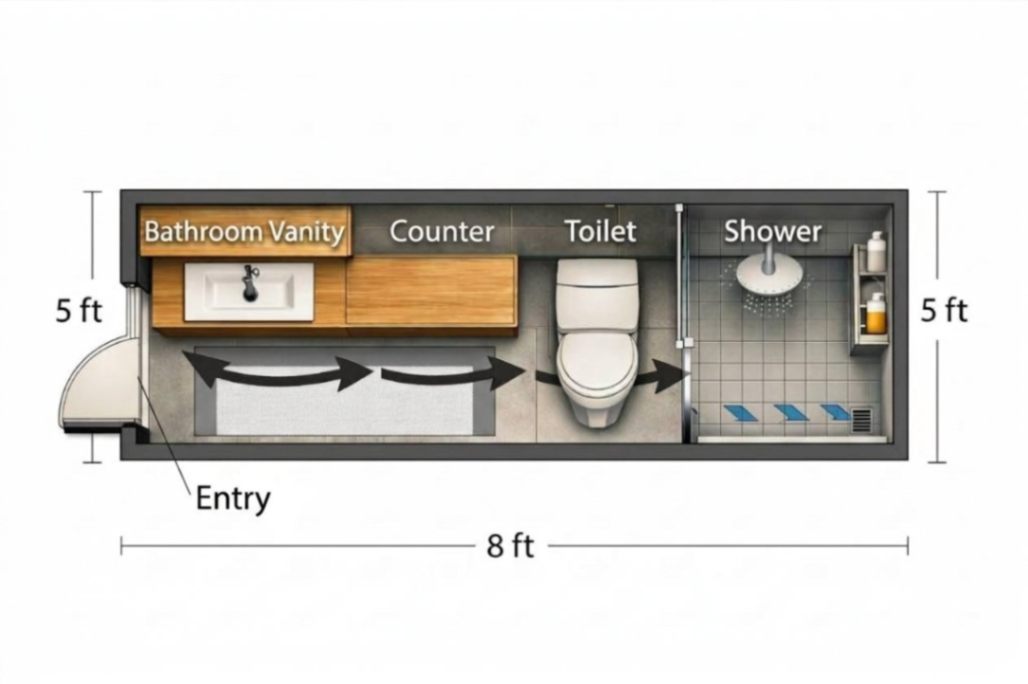
Important: A 5×8-foot example is a planning illustration, not a universal code requirement. Required clearances vary by jurisdiction, fixture type and accessibility needs. Professional bathroom planning guidance considers clear floor spaces, doorways, fixture locations, storage, lighting, ventilation and code compliance rather than treating the room as decoration alone.
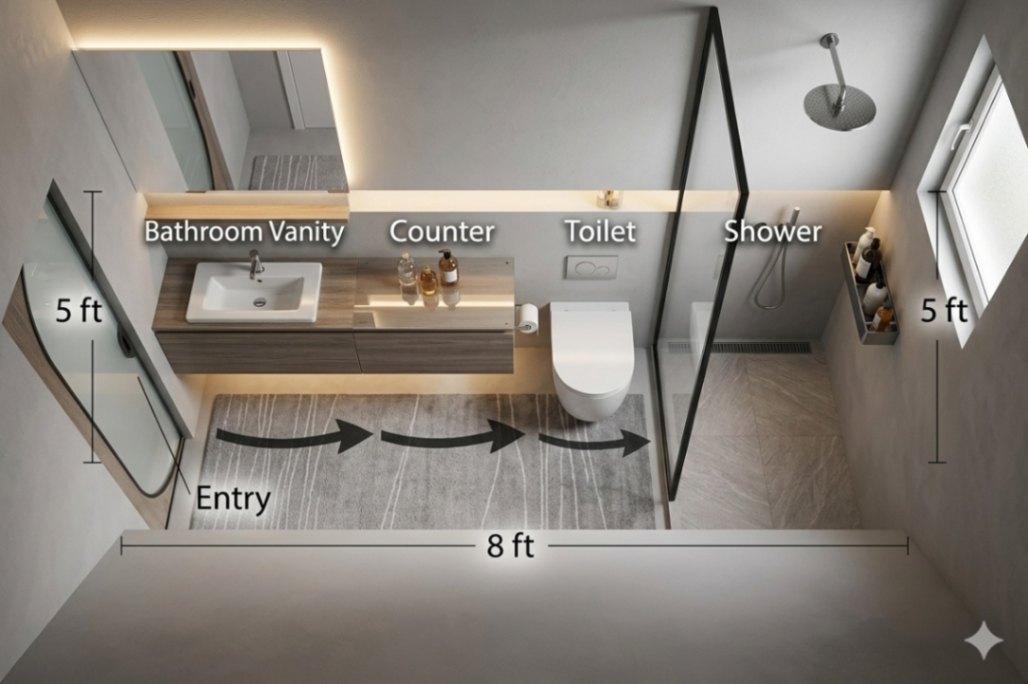
2. The 5×8 Walk-In Shower Layout
If you prefer a more open appearance, a walk-in shower can replace a bulky enclosed shower unit. One possible arrangement is:
Vanity → toilet → full-width shower
A fixed clear-glass panel can separate the shower from the rest of the room without creating a large visual barrier.
Why this can work:
A transparent shower screen allows the eye to continue through the bathroom. Instead of seeing:
wall → shower frame → glass → wall
you can create a much simpler visual field.
But there is an important warning:
A walk-in shower is not automatically better simply because it looks modern. You need to consider:
• Water splash
• Drain position
• Floor slope
• Waterproofing
• Shower depth
• Glass-panel position
• Door position, if one is used
• Building requirements
A poorly planned open shower can make the rest of your bathroom wet.
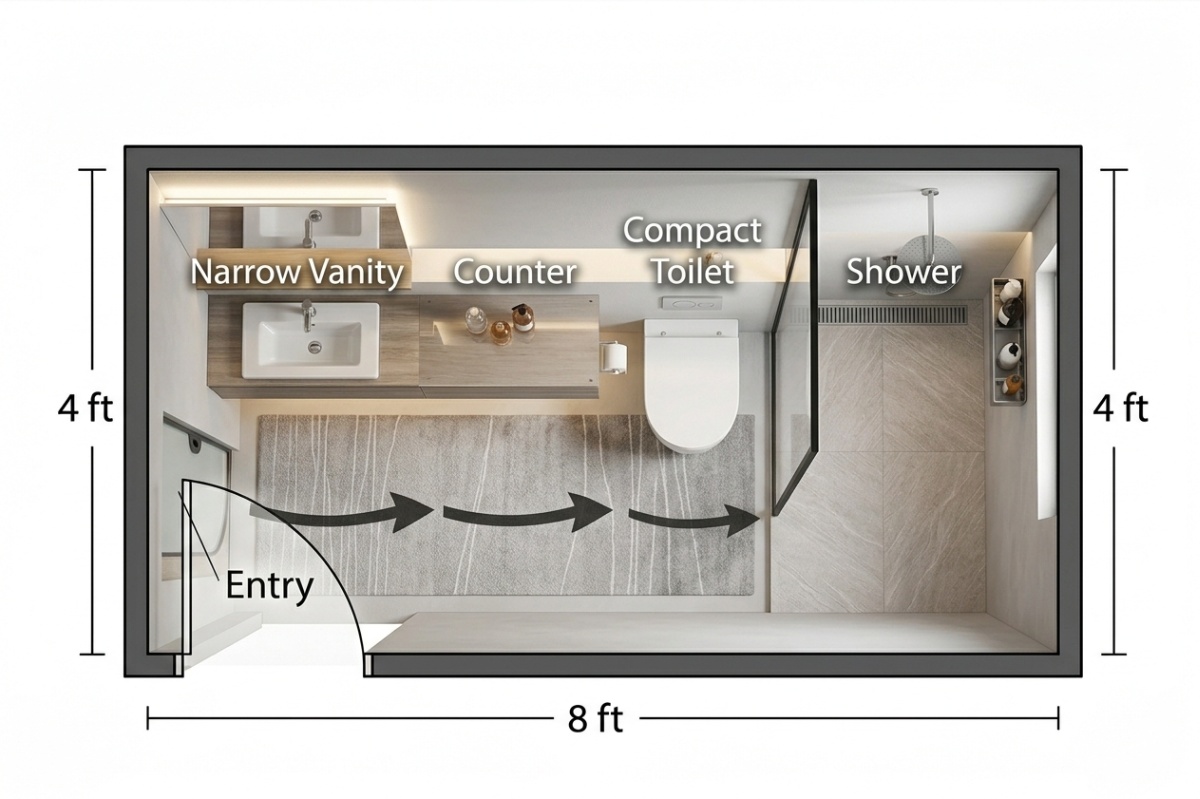
3. The Narrow 4×8 Bathroom
A narrow bathroom requires a different approach. Instead of trying to place everything side by side, think about the room as a corridor.
A possible sequence is:
Vanity → toilet → shower
The shower can occupy the far end of the room. This arrangement makes the shower the visual destination instead of placing a large object directly at the entrance.
The key principle:
Do not fight the shape of the room. If the bathroom is long and narrow, work with the length.
Use:
• A narrow vanity
• A compact toilet
• A shower at the end
• A large mirror
• Light finishes
• Minimal floor clutter
4. The Small Square Bathroom
Square bathrooms can be surprisingly flexible. A compact square room may allow a corner shower, corner vanity or fixtures arranged around the perimeter. The important thing is to avoid placing too many objects in the center.
A useful approach:
Keep the center of the room visually open and push functions toward the walls. This creates a simple principle:
“Edges are for functions. The center is for movement.”
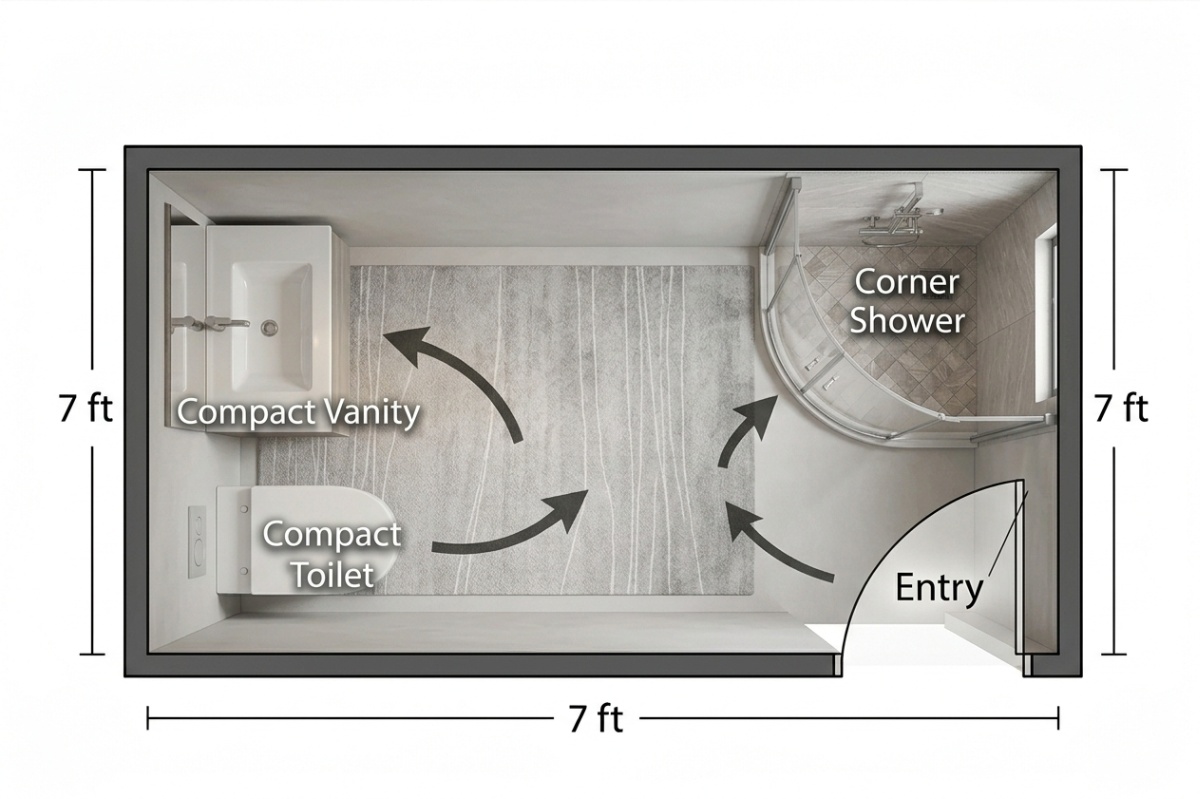
The best Small Bathroom Layout Ideas for Studio Apartments are not necessarily the ones with the smallest fixtures. They are the layouts that make the available space work as a connected system. When the toilet, vanity, shower, storage and entrance are positioned with circulation in mind, the bathroom can feel more usable without physically becoming larger.
5. The Corner Shower Layout
A corner shower can be useful when you need to keep the central part of the bathroom available for movement. Instead of allowing the shower to occupy the entire width of one wall, the shower sits in a corner.
This can leave room for:
• A small vanity
• Toilet
• Tall storage
• Towel hooks
• Better circulation
The downside is that a corner enclosure can introduce more visual framing than a simple fixed glass panel. Choose based on both space and visual openness.
6. The Wet-Room Layout
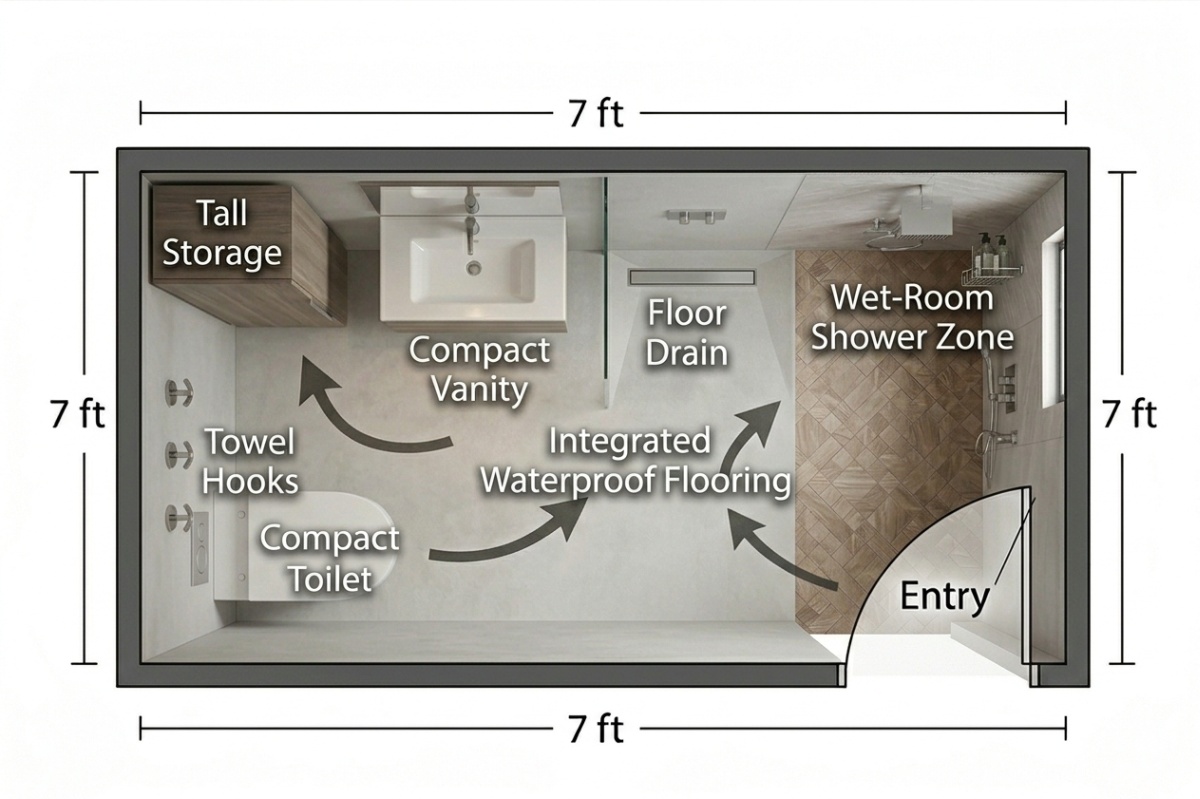
A wet room takes the open-shower idea further by treating much of the bathroom as one waterproofed area. This can be extremely useful in compact bathrooms because you are not trying to fit a separate shower box into an already small room.
But wet rooms require careful construction. The floor needs appropriate drainage and slope, waterproofing must be correctly designed and installed, and splash control still matters.
Best for:
• Very compact bathrooms
• Modern apartment renovations
• Bathrooms where a separate shower enclosure would consume too much space
Not ideal when:
• Waterproofing cannot be properly installed
• Building rules prevent the proposed renovation
• The floor structure cannot accommodate the required drainage arrangement
Step 3: The Bathroom Door Can Change the Entire Layout
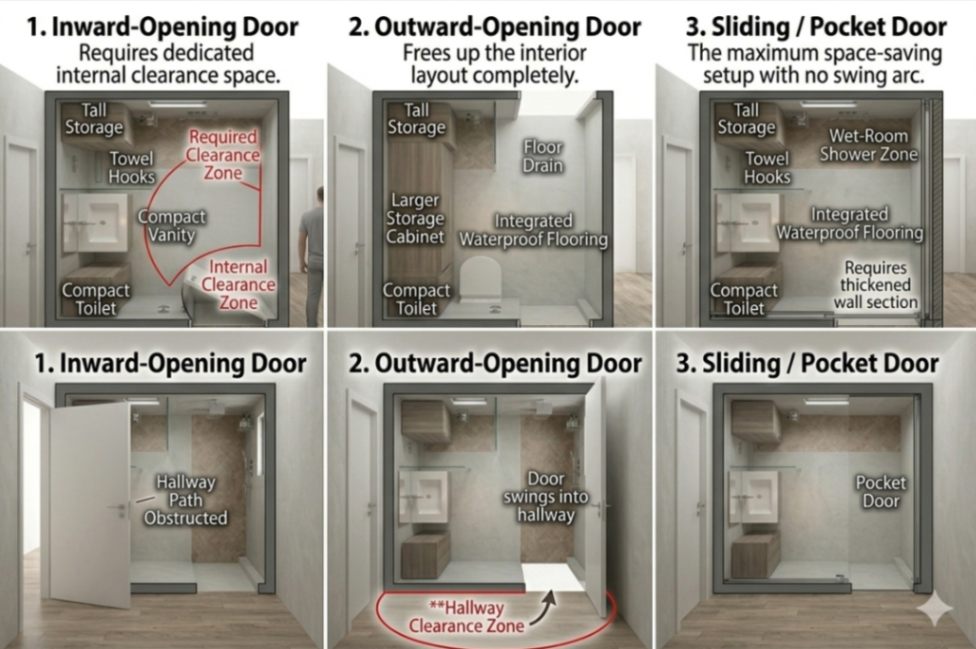
One of the most overlooked parts of a small bathroom is the door. An inward-opening door can occupy valuable floor area every time it opens. Depending on the building and wall construction, alternatives may include:
• Outward-opening door
• Pocket door
• Sliding door
But none of these should be selected without checking the actual building conditions. A pocket door, for example, needs enough suitable wall space for the door to slide into. Electrical wiring, plumbing or structural elements inside the wall may make this difficult.
A simple test:
Draw the door swing on your floor plan. Then ask:
What does the door block when it opens?
If it blocks the vanity, toilet, shower entrance or the main circulation path, investigate another arrangement.
Step 4: Put Fixtures Where They Create Flow
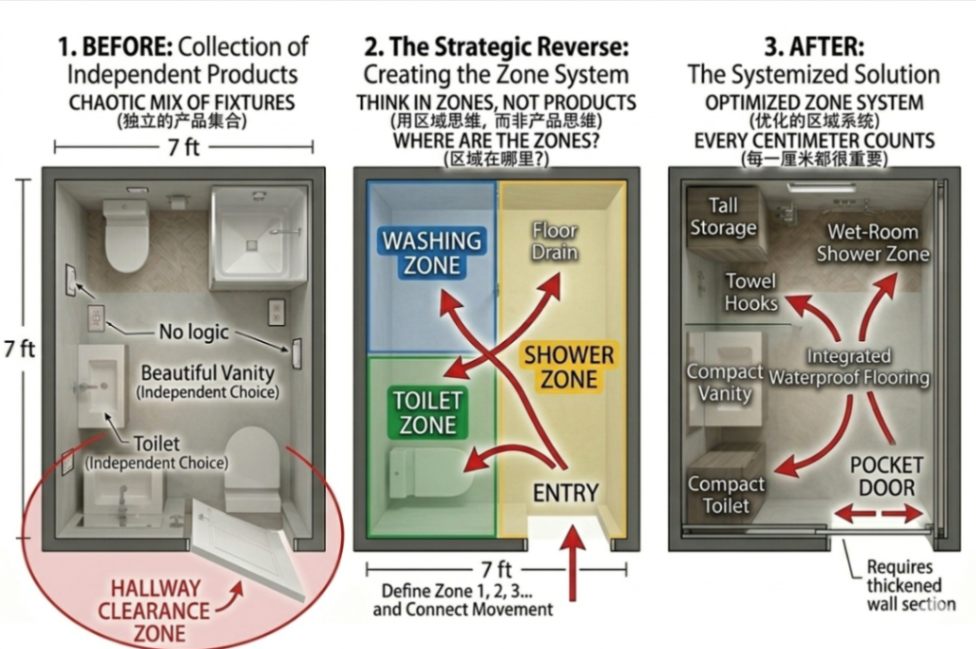
A common mistake is choosing each fixture independently. Someone finds a beautiful vanity. Then they find a toilet. Then they choose a shower. Finally, they try to make everything fit.
Reverse the process.
Start with the room. Then create the movement. Then place the fixtures. Then choose the products. This is particularly important in a studio apartment because every centimeter matters.
Think in zones:
Instead of thinking:
“Where should I put the toilet?”
think:
“Where is the toilet zone?”
Then:
“Where is the washing zone?”
Then:
“Where is the shower zone?”
Then:
“How do these zones connect?”
This approach creates a bathroom that works as a system rather than a collection of individual products.
Step 5: Make the Floor Look Bigger
You cannot physically enlarge the bathroom without changing its walls. But you can change how large it feels. One of the strongest strategies is to keep the floor visually open.
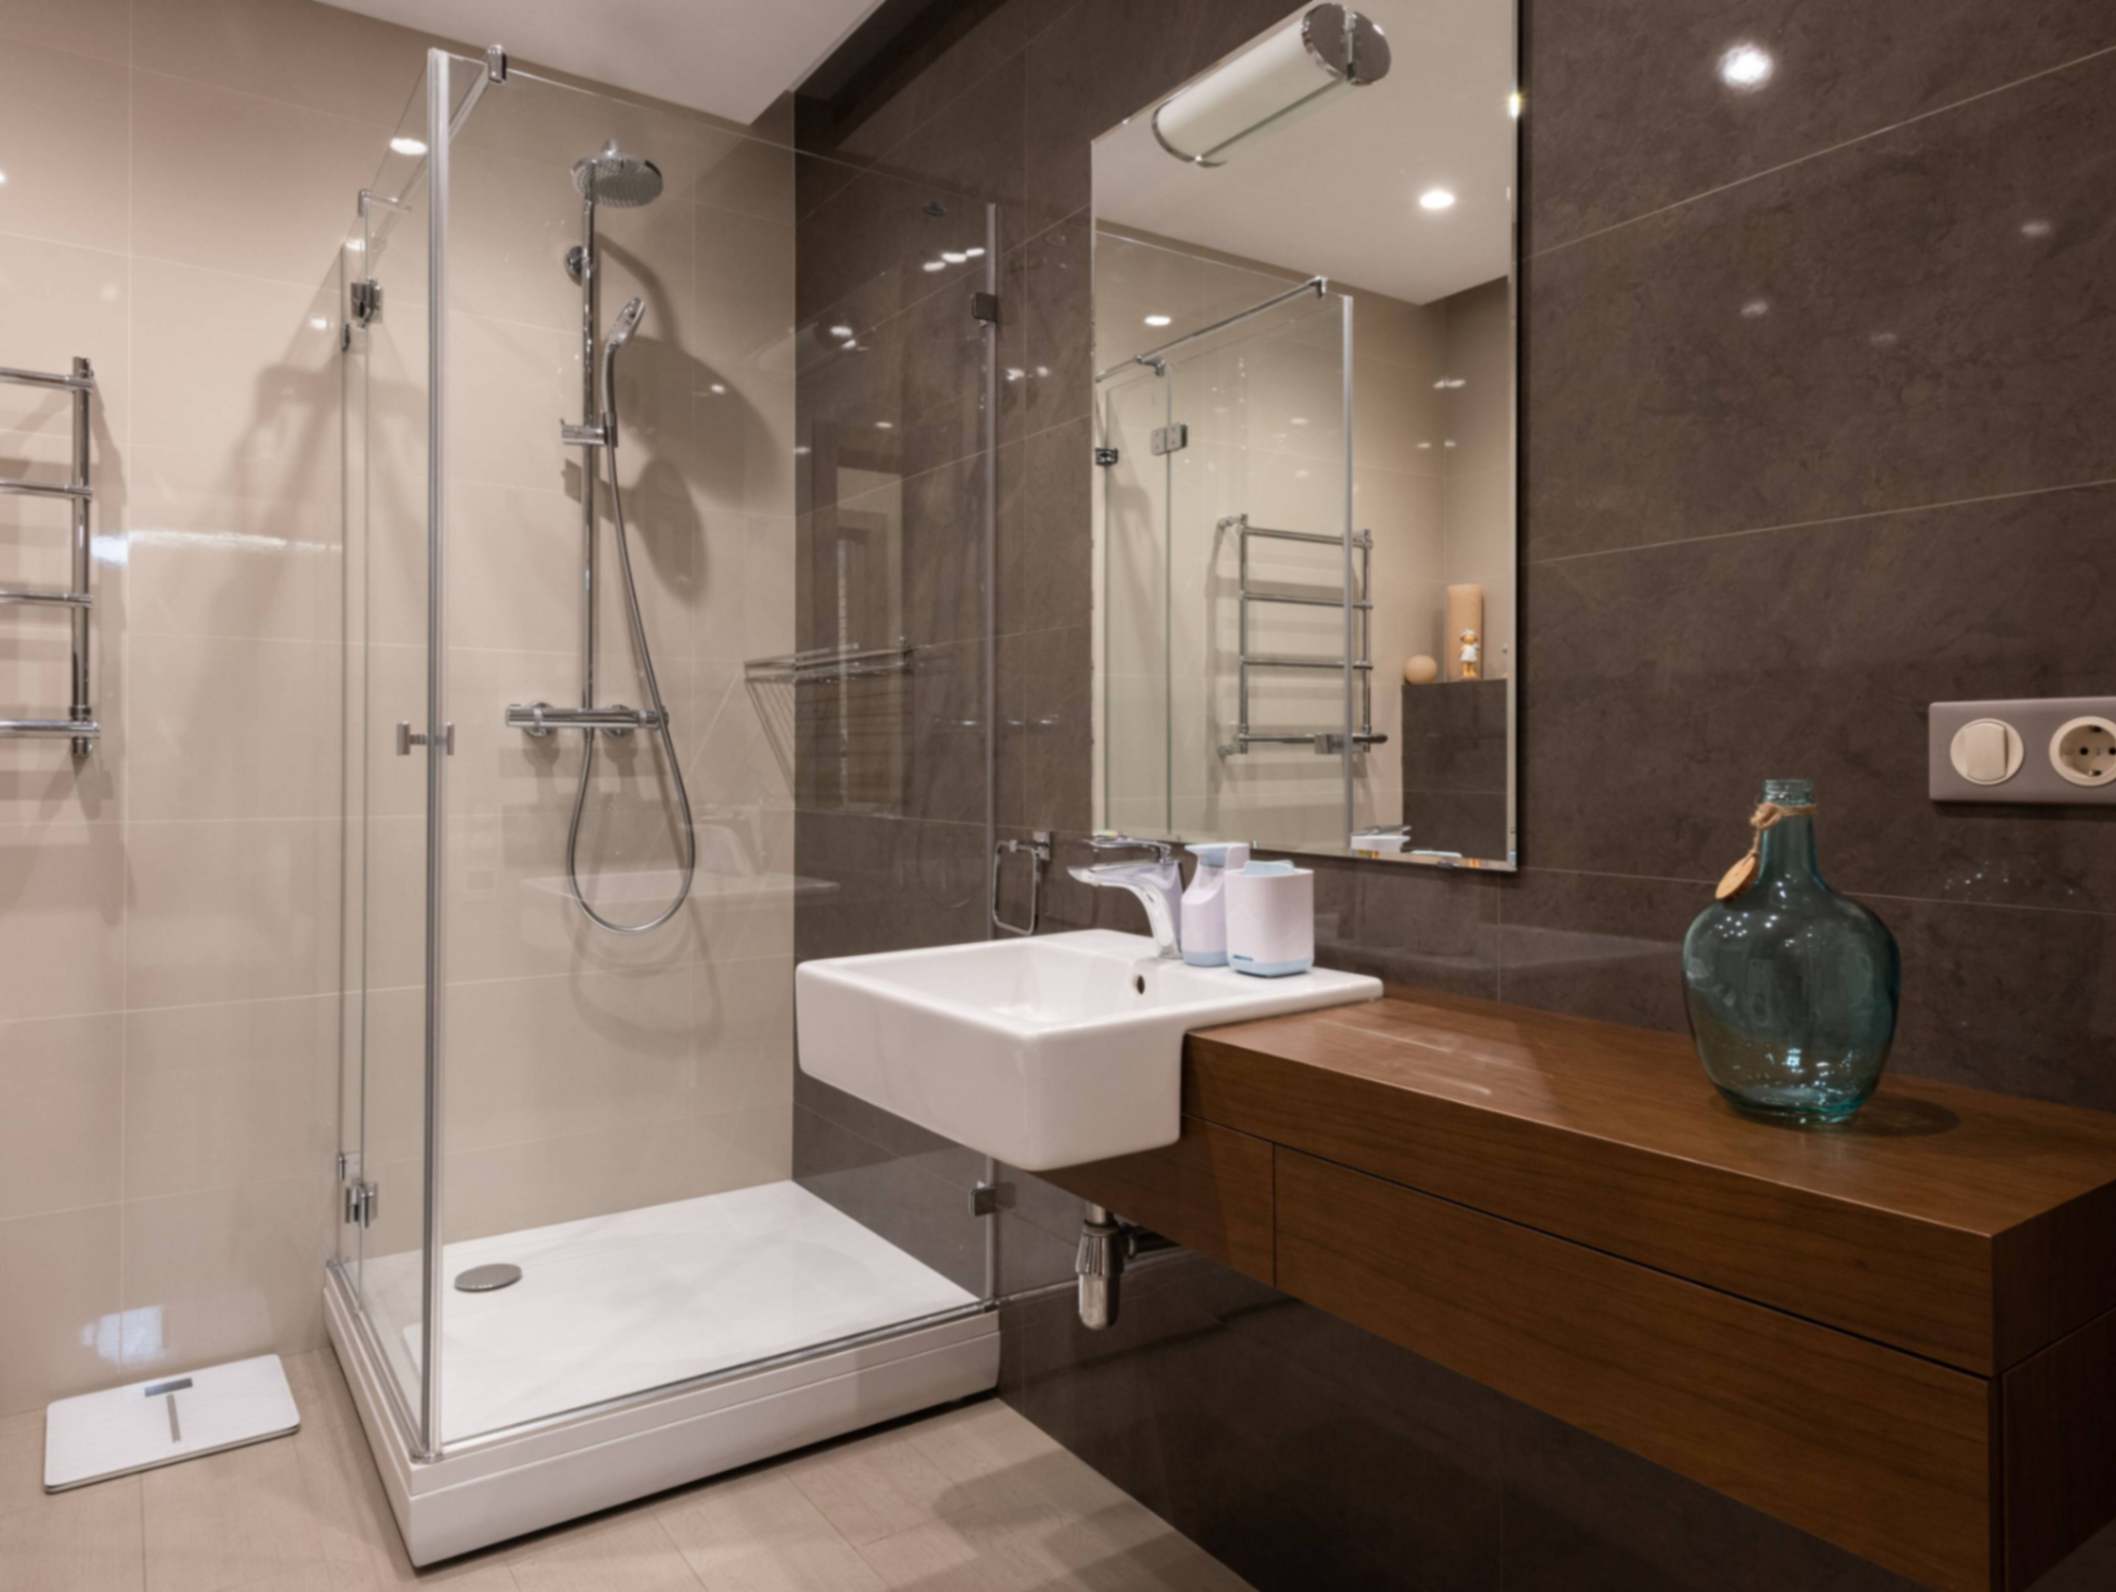
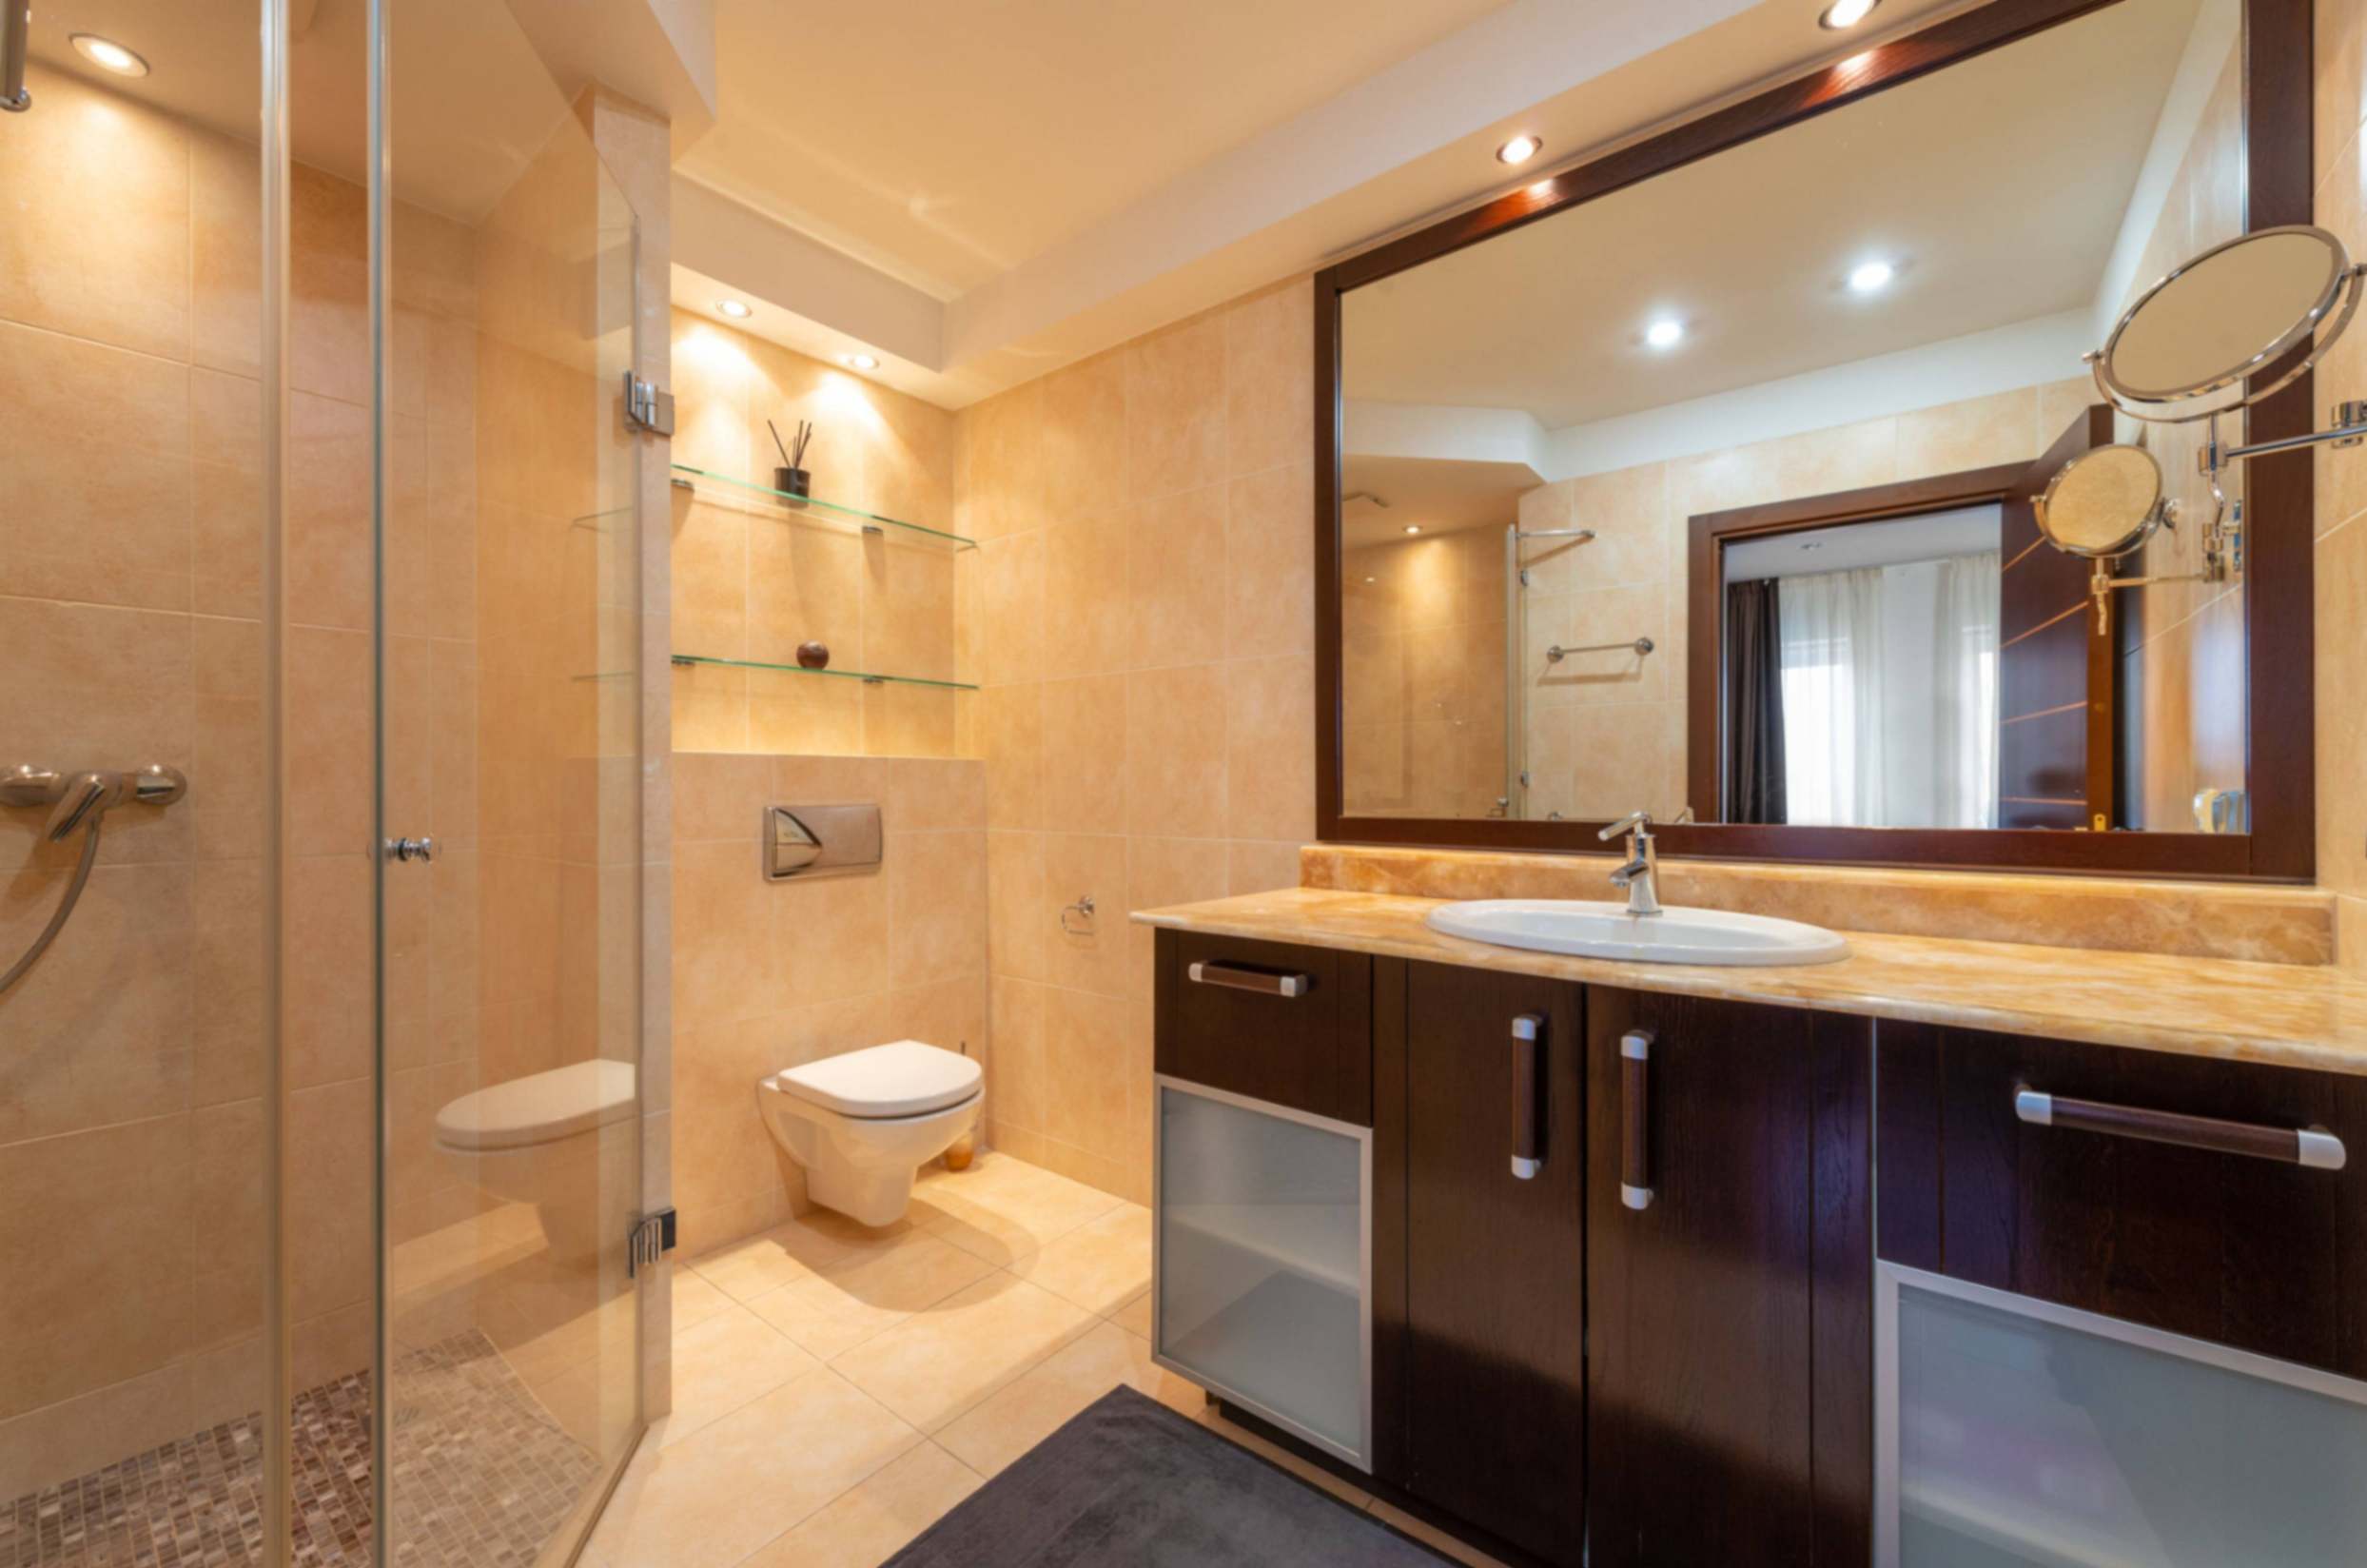
Use a floating vanity
A wall mounted vanity leaves visible floor underneath. That does not give you more physical floor area, but it can make the room feel lighter and less crowded. It also makes cleaning underneath easier.
Consider a wall-hung toilet
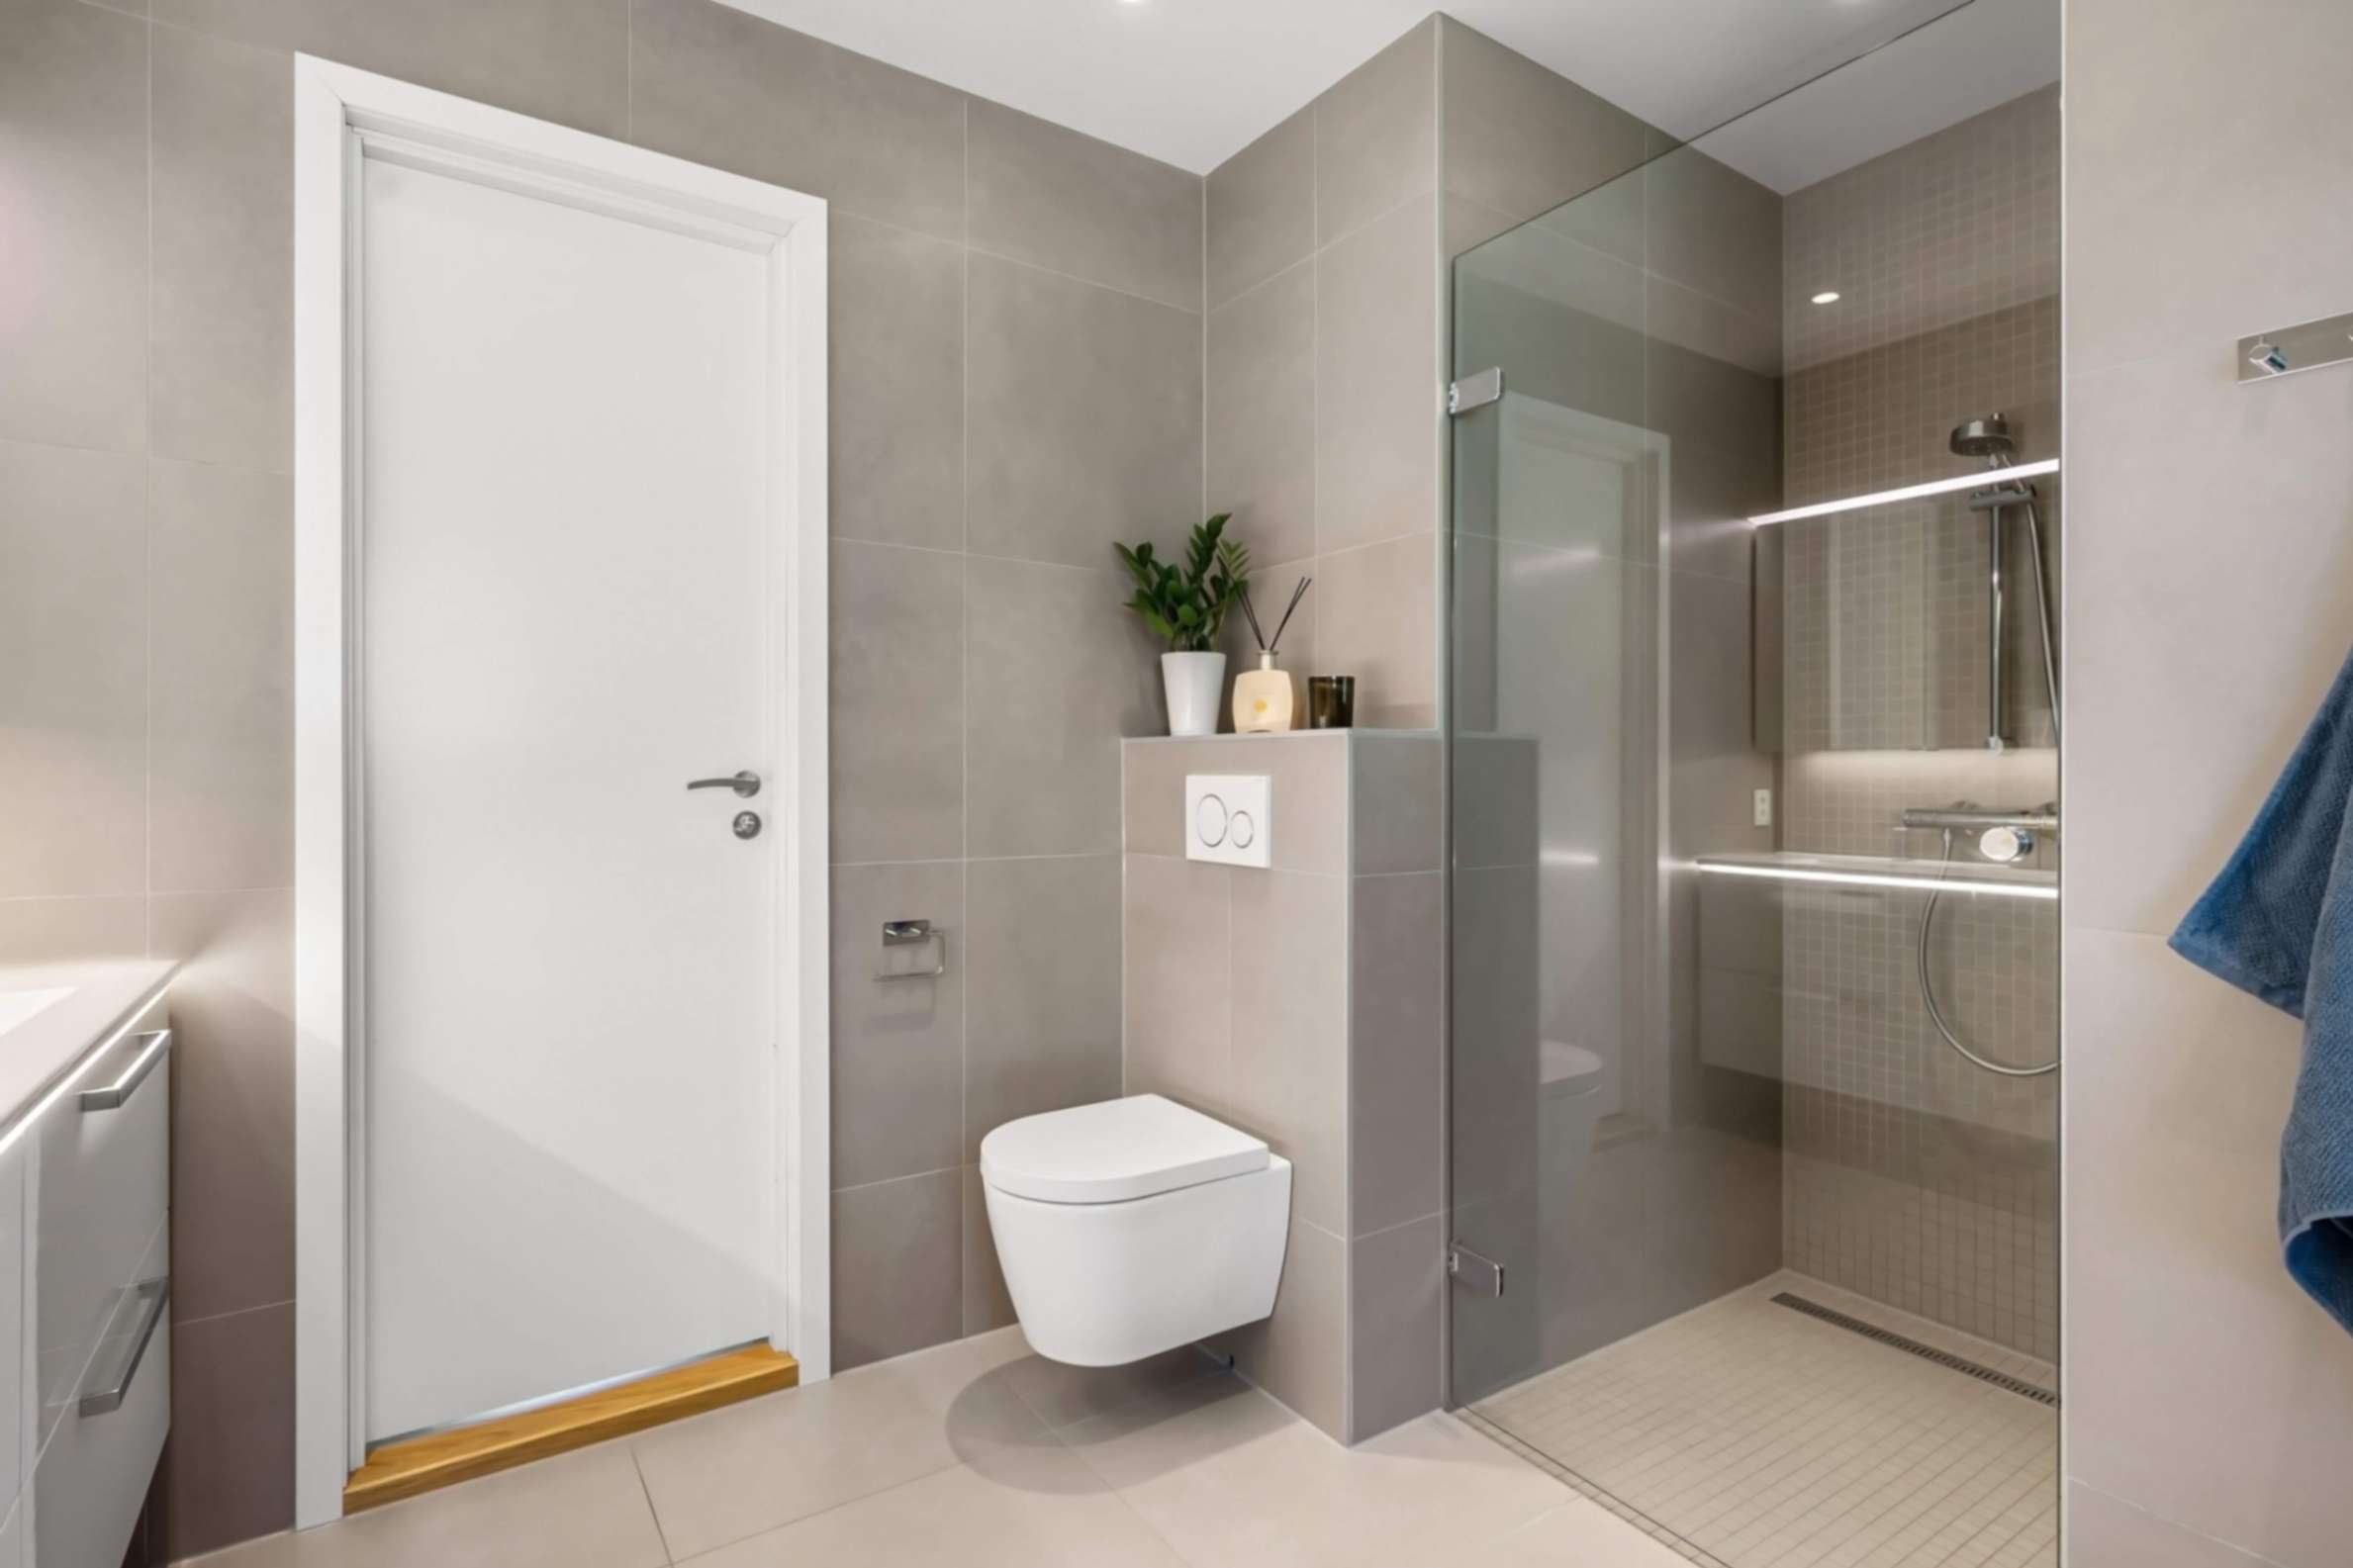
A wall-hung toilet can create a cleaner appearance because the tank and supporting structure can be concealed within a suitable wall system. However, this is not a simple replacement in every apartment. The wall structure, concealed cistern, plumbing and access requirements must be considered. If the existing construction does not support it easily, another toilet design may be more practical.
Use clear glass
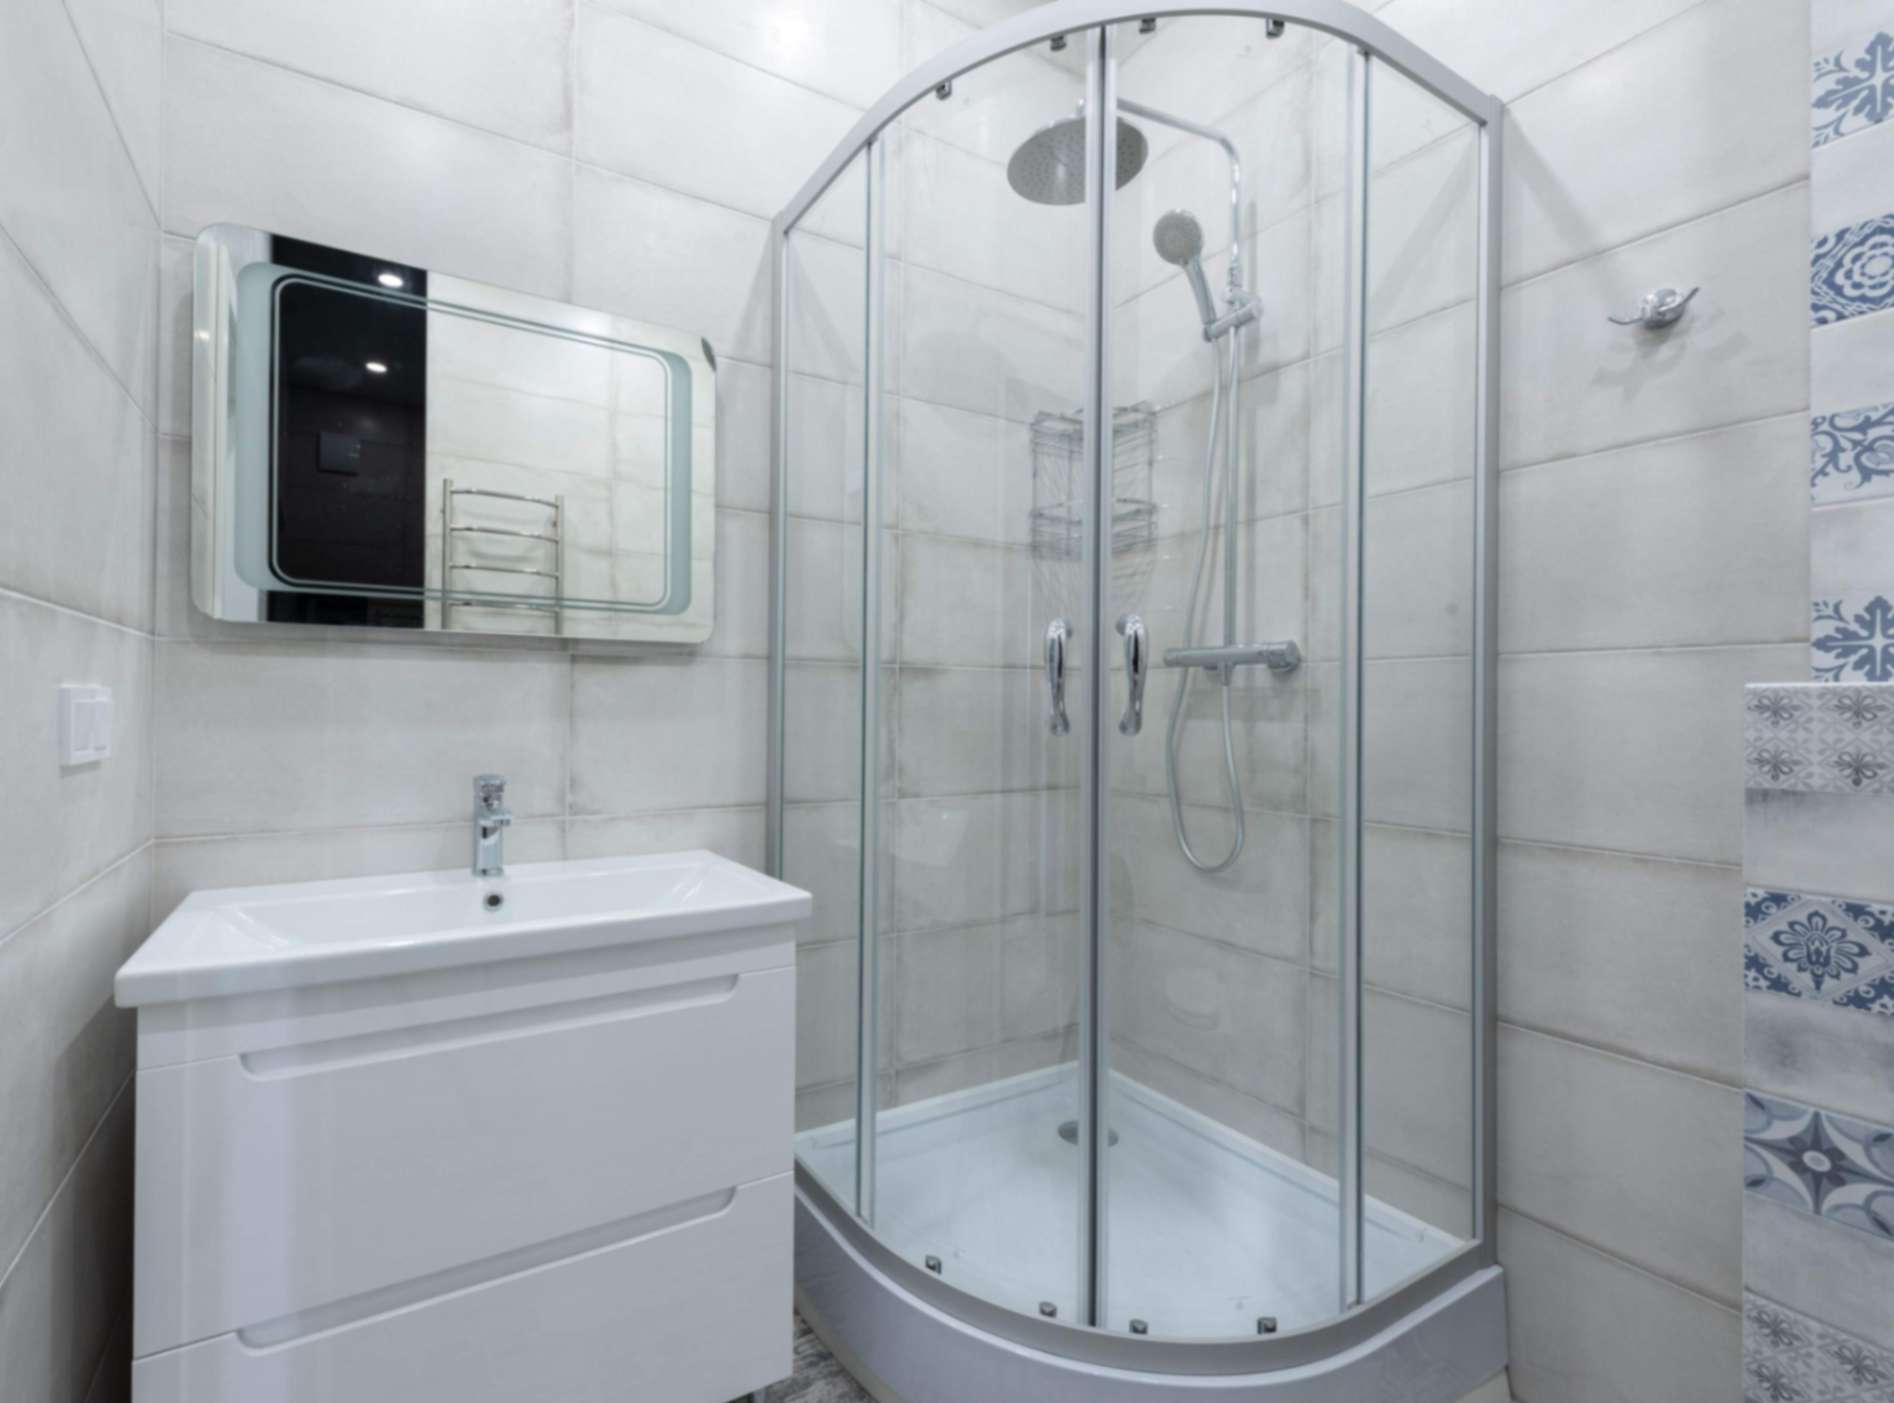
A framed or heavily opaque shower enclosure creates a visual stop. Clear glass creates less interruption. This is especially useful when the shower is positioned between the viewer and the back wall.
Use a large mirror
A large mirror can visually expand a small bathroom by reflecting light and creating another visual layer. For a studio apartment, a mirrored cabinet can be even more useful because it combines two functions:
mirror + storage
That is exactly the kind of overlap a compact home needs.
Step 6: Small Bathroom Storage Ideas That Do Not Steal the Floor
Storage is where many small bathrooms fail. The solution is not necessarily to add more cabinets. The better question is:
Where can storage disappear into the architecture?
1. Recessed Shower Niche
A recessed niche places toiletries inside the wall rather than on the shower floor. This keeps bottles organized and reduces clutter.
2. Mirrored Medicine Cabinet
Instead of hanging a flat mirror and then finding another place for toiletries, use a mirrored cabinet where appropriate. This gives you storage without adding another object to the floor.
3. Vanity Drawers
Drawers can make better use of the lower vanity area than a completely open shelf. Separate everyday items from less frequently used products.
4. Use Vertical Space
Look upward. A tall narrow cabinet may hold more than a wide low cabinet while using less floor width. Other possibilities include:
• Tall towel storage
• Wall hooks
• Over-door storage where appropriate
• Vertical shelving
• Wall-mounted baskets
5. Hide the Laundry Hamper
A laundry basket sitting permanently on the floor can make a tiny bathroom feel even smaller. If possible, integrate the hamper into a vanity, cabinet or another dedicated storage area. The goal is not to hide everything. The goal is to prevent everyday objects from randomly occupying the floor.
Step 7: Choose the Shower Based on Your Space
The shower is often the largest zone in a compact bathroom. Your choice can therefore change the entire room.
Walk-In Shower
Advantages:
• Open appearance
• Easy visual connection with the rest of the room
• Can work well with clear glass
Considerations:
• Splash control
• Drainage
• Waterproofing
• Floor slope
Enclosed Shower
Advantages:
• Better splash containment
• Clear separation from the rest of the bathroom
• Useful when the room cannot tolerate much water outside the shower
Considerations:
• More visual framing
• Door swing or sliding mechanism
• More hardware
Wet Room
Advantages:
• Very space-efficient
• Flexible shower positioning
• Can make a tiny bathroom feel more open
Considerations:
• Requires careful waterproofing
• Drainage becomes critical
• Construction quality matters greatly
The best shower is not necessarily the most fashionable one. It is the one that works with the shape, drainage, waterproofing and circulation of your bathroom.
Step 8: Use Lighting to Make the Bathroom Feel Larger
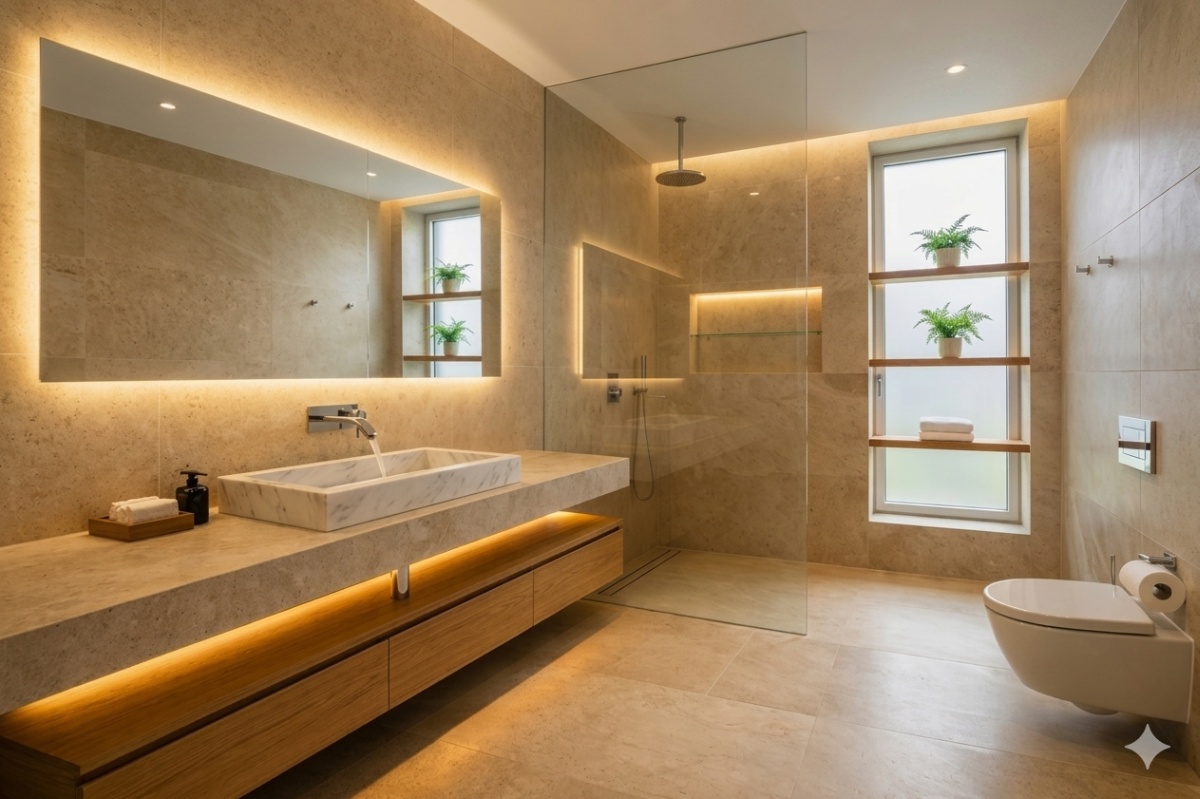
A small bathroom with poor lighting can feel much smaller than it actually is. Think about lighting in layers.
Layer 1: General Lighting
This provides overall illumination. A ceiling light is common, but the exact fixture and location should depend on the room and electrical requirements.
Layer 2: Mirror Lighting
This is where you need focused light for tasks such as shaving, applying makeup or grooming. Lighting beside the mirror can reduce harsh shadows compared with relying only on a ceiling light. Professional bathroom planning guidance also considers lighting placement as part of functional bathroom planning.
Layer 3: Accent Lighting
A small amount of indirect lighting can add depth. For example:
• Behind a mirror
• Under a floating vanity
• Inside a recessed niche
Do not turn the bathroom into a showroom full of lights. A few well-positioned layers are usually more effective.
Step 9: Solve Ventilation Before You Solve Decoration
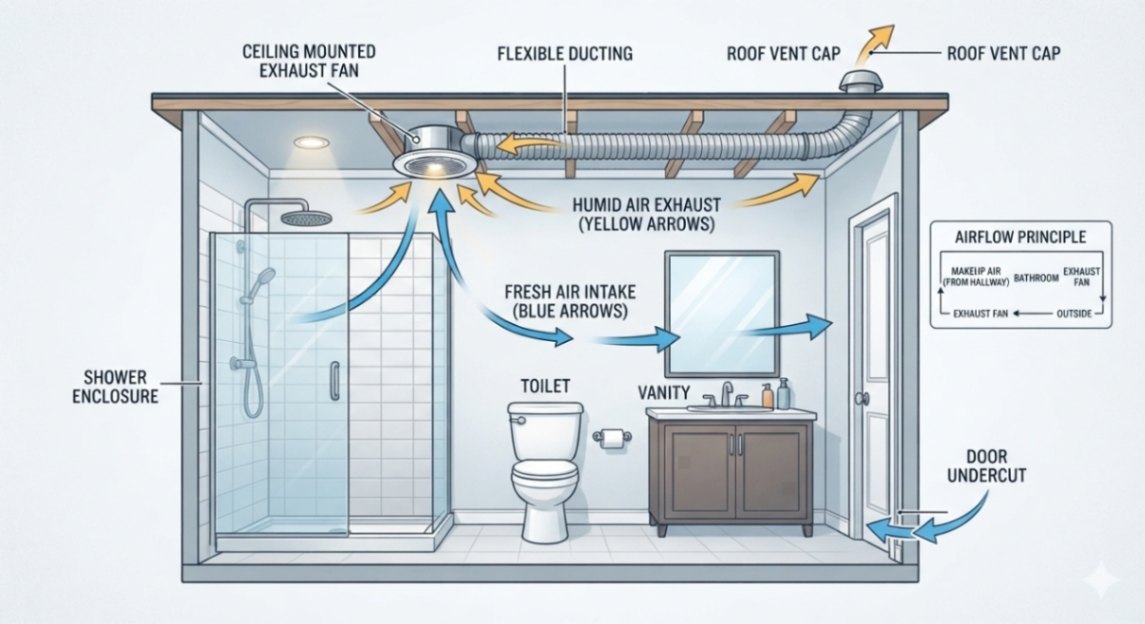
This is one of the most important sections of the entire bathroom plan. A bathroom creates moisture every time someone takes a shower. In a studio apartment, that moisture does not simply disappear. It can move into the surrounding living space if the bathroom is poorly ventilated.
The EPA recommends adequate ventilation to help control indoor pollutants, odors and humidity, and specifically notes the importance of bathroom exhaust ventilation for removing moisture.
What Should You Consider?
Exhaust Fan
An enclosed bathroom should normally have an appropriate mechanical exhaust system where required. The exact fan capacity should be based on the bathroom size, ventilation design, manufacturer information and applicable local requirements.
For example, NKBA ventilation guidance provides calculation methods based on room volume, while other planning guidance gives bathroom ventilation recommendations. Do not simply copy a fan size from another bathroom. A larger or differently configured room may require a different solution.
Where Should the Air Go?
A bathroom fan needs a proper exhaust path. The objective is to remove humid air from the bathroom rather than simply moving it into another part of the apartment.
For an apartment, always consider the building’s existing ventilation system and local requirements before changing or installing ductwork.
What About a Bathroom With No Window?
A windowless bathroom can still work. The important thing is to have an appropriate mechanical ventilation strategy.
Also:
• Keep wet surfaces as dry as practical
• Allow towels to dry properly
• Clean exhaust grilles
• Keep the shower area from remaining constantly wet
• Address leaks quickly
The EPA recommends controlling indoor humidity and notes that high humidity can increase the likelihood of mold.
Step 10: Do Not Ignore Bathroom Odors
Odors in a studio apartment are especially noticeable because the bathroom is close to the living and sleeping areas. Good ventilation helps, but it is not the only consideration.
Your plumbing system also matters. A properly functioning trap helps prevent sewer gases from entering the bathroom through drainage fixtures. If you notice persistent sewer-like odors, do not simply cover them with air freshener. Investigate the source.
Possible causes:
• Dry or defective traps
• Drain problems
• Plumbing leaks
• Ventilation problems
• Poorly sealed connections
• Drain buildup
A bathroom should smell clean because the underlying system works properly, not because strong fragrance is masking the problem.
Step 11: Choose Materials That Work in a Small Bathroom
You do not need expensive materials to create a sophisticated bathroom. You need materials that work together.
Keep the Visual Palette Controlled
A simple combination can be more effective than using five different tile styles. For example:
Main surface: light neutral tile
Accent: textured tile in shower niche
Fixtures: one consistent finish
Wood element: vanity
This creates a visual hierarchy.
Large-Format Tile Can Reduce Visual Breaks
Large tiles can create fewer grout lines, which may make a compact room appear more continuous. However, tile size should also consider:
• Room dimensions
• Drain location
• Wall conditions
• Installation requirements
• Floor slope
• Cutting and waste
Do not choose a tile simply because it is large. Choose one that works with the actual room.
Use Texture Carefully
Texture can add character without requiring another color. A textured shower wall, ribbed vanity or stone-look surface can create interest while keeping the palette controlled.
Step 12: Make a Small Bathroom Feel More Luxurious
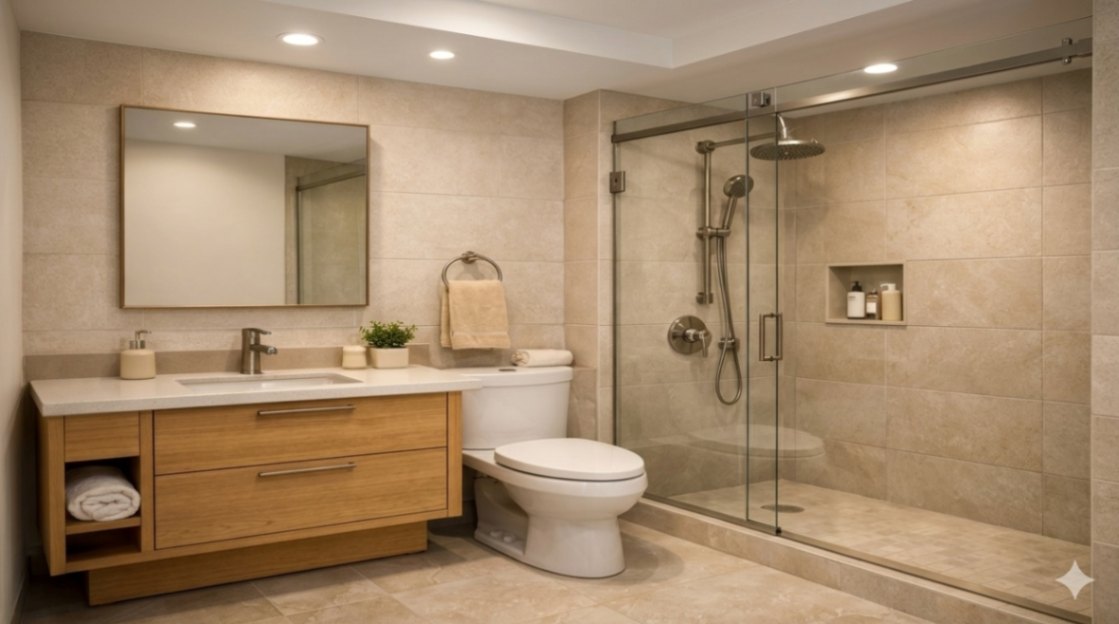
Luxury in a small bathroom does not come from filling the room with expensive objects. It usually comes from simplicity and consistency.
Try:
• One strong mirror
• One coordinated fixture finish
• Clean grout lines
• Good lighting
• Clear glass
• Minimal countertop clutter
• Quality-looking hardware
• Hidden storage
• A controlled color palette
The room can be small and still feel intentional. Think “hotel bathroom,” not “storage room.” Everything should have a place.
Step 13: What If You Are Renting?
Not every studio apartment allows major renovation. You can still improve the bathroom without changing its structure.
Try focusing on reversible improvements such as:
• Large decorative mirror where permitted
• Better lighting
• Adhesive or removable hooks suitable for the surface
• Slim storage organizers
• Matching towels
• Shower organization
• Countertop organization
• Small plants where conditions allow
• Decluttering
• Coordinated accessories
Avoid drilling, plumbing changes or electrical work unless the landlord and applicable building rules allow it. The renter’s strategy is simple:
Improve the visual system without changing the building system.
Step 14: Bathroom Safety Still Comes First
A small bathroom should never sacrifice safety just to save space. Pay attention to:
• Slippery floors
• Water escaping the shower
• Electrical safety
• Sharp edges
• Glass safety
• Grab-bar requirements where applicable
• Adequate lighting
• Safe access around fixtures
Tile slip resistance is one of the areas covered in professional bathroom planning guidance, alongside waterproofing, lighting, storage, ventilation and other building-system considerations.
For glass shower screens, use appropriately rated safety glass and have it installed according to local requirements and manufacturer specifications. Do not assume that a particular glass thickness or floor-rating number is universally correct for every bathroom.
10 Small Bathroom Mistakes That Make the Room Feel Smaller
1. Buying Fixtures Before Measuring
The fixture may look perfect online but be completely wrong for your room.
2. Blocking the Entrance
If the first thing you see is a large cabinet or fixture blocking movement, the room will feel cramped.
3. Using Too Many Colors
Multiple competing colors create visual noise.
4. Leaving Everything on the Counter
A beautiful vanity disappears under bottles and toiletries.
5. Ignoring the Door Swing
A door can consume some of your most valuable floor area.
6. Adding a Huge Cabinet
More storage does not always mean better storage.
7. Poor Shower Splash Control
An open shower that floods the rest of the bathroom is not a successful space-saving design.
8. Weak Ventilation
A beautiful bathroom with persistent humidity is still a badly designed bathroom.
9. Relying on One Ceiling Light
Your face can be poorly lit even when the room appears bright.
10. Copying a Photo Without Checking Dimensions
A bathroom photographed with a wide-angle lens may look much larger than it really is.
Always ask:
What Are the Actual Dimensions?
The Josiah Digital Hub Compact Bathroom Blueprint
If you are starting from an empty room and do not know where to begin, follow this sequence.
Step 1: Measure
Record the exact room dimensions.
Step 2: Draw
Create a simple overhead floor plan.
Step 3: Mark the Door
Show the door opening and available alternatives.
Step 4: Mark Plumbing
Identify existing water and drainage points.
Step 5: Choose Your Layout
Select the arrangement that creates the best circulation.
Step 6: Create the Wet Zone
Decide where the shower belongs and how water will be contained.
Step 7: Protect the Visual Floor
Consider floating or wall-mounted elements where practical.
Step 8: Build Storage Into the Walls
Use niches, mirrored cabinets and vertical storage.
Step 9: Plan Lighting
Use general, task and optional accent lighting.
Step 10: Plan Ventilation
Make sure humid air has an appropriate way out.
Step 11: Select Materials
Keep the palette simple and coordinate the surfaces.
Step 12: Check Safety and Local Requirements
Before construction, confirm that the final plan complies with the relevant building, plumbing, electrical, waterproofing and safety requirements.
Which Small Bathroom Layout Is Best for You?
| Bathroom Situation | Layout Worth Considering | Main “Advantage |
|---|---|---|
| 5×8 bathroom | Linear or walk-in shower | Flexible arrangement |
| Narrow bathroom | Fixtures along the length | Works with the room shape |
| Small square bathroom | Corner layout | Keeps the center open |
| Very compact bathroom | Wet-room concept | Uses the room efficiently |
| Limited floor space | Floating fixtures | More visible floor |
| Limited storage | Recessed + vertical storage | Uses wall space |
| Poor visual openness | Clear glass + mirror | Fewer visual barriers |
| Windowless bathroom | Mechanical ventilation | Helps remove moisture |
“Remember that this table is a starting point, not a replacement for a dimensioned plan or local code review.”
Frequently Asked Questions About Small Bathroom Layouts
What Is the Best Layout for a Small Bathroom?
There is no single best layout for every bathroom. In many compact bathrooms, a simple linear arrangement works well because it creates a clear movement path. Corner layouts and wet-room arrangements can also work depending on the room shape, plumbing and shower requirements.
Is 5×8 Enough for a Small Bathroom?
A 5×8-foot room can accommodate a compact bathroom arrangement, but the final layout depends on fixture sizes, door location, required clearances, plumbing and applicable local requirements.
Use the dimensions as a starting point rather than assuming every 5×8 bathroom can use the same plan.
Is a Walk-In Shower Better Than a Bathtub in a Small Bathroom?
If your priority is saving space and creating an open appearance, a shower can be more practical than a bathtub. A walk-in shower can also create a stronger visual connection across the room.
However, the best choice depends on how the bathroom will be used.
How Can I Make My Tiny Bathroom Look Bigger?
Start with circulation and visual openness.
Use:
Clear glass
Large mirrors
Light or coordinated surfaces
Floating fixtures
Recessed storage
Minimal floor clutter
Good lighting
The goal is not to trick the eye with decoration alone. It is to reduce unnecessary visual and physical obstacles.
Should I Use a Floating Vanity?
A floating vanity can be a strong option for a compact bathroom because it keeps some floor visible underneath and can create a lighter appearance.
Make sure the wall structure and installation method are suitable for the vanity.
How Do I Add Storage to a Small Bathroom?
Start with wall space.
Consider:
Recessed niches
Mirrored cabinets
Vanity drawers
Tall narrow cabinets
Wall hooks
Vertical shelving
Whenever possible, give everyday items a dedicated home.
For a curated selection of bathroom storage, fixtures and space-saving products, explore the Josiah Digital Hub Product Index.
How Do I Stop a Small Bathroom From Smelling?
Look for the actual cause rather than masking the odor.
Check ventilation, drains, traps and plumbing connections. Persistent sewer-like odors should be investigated rather than covered with fragrance.
Can a Small Bathroom Work Without a Window?
Yes. A windowless bathroom can work with an appropriately designed mechanical ventilation system. Moisture control becomes particularly important because showers add significant humidity to the room.
Can I Put a Washing Machine in a Small Bathroom?
Sometimes, but it depends on the available space and the building’s plumbing, drainage, electrical and ventilation requirements.
A compact bathroom should not be overloaded simply to fit an appliance.
If the washing machine makes circulation, storage or shower access poor, another location may be a better solution.
Final Thoughts: Small Does Not Mean Poorly Designed
The biggest mistake when designing a small bathroom is thinking only about how to fit everything inside.
The better question is:
How can everything work together?
A good compact bathroom does not need a huge vanity.
It does not need a massive shower.
It does not need expensive marble.
It needs a layout that makes sense.
It needs enough circulation to move comfortably.
It needs storage that does not consume the floor.
It needs lighting that supports everyday tasks.
It needs materials that work together.
And it needs ventilation and moisture control that keep the space comfortable.
That is the difference between fitting fixtures into a small room and actually designing a small bathroom.
Ultimately, Small Bathroom Layout Ideas for Studio Apartments should be judged by how well they support everyday life. The right layout gives you enough room to enter, move, shower, use the toilet, reach your storage and maintain the space without constantly feeling restricted. That practical balance is what turns a compact bathroom from a difficult space into a well-planned part of the home.
At Josiah Digital Hub, the goal is simple: take the problems that come with compact living and turn them into practical, visual solutions that ordinary apartment owners and renters can understand and use.
If you are planning the rest of your studio apartment, continue exploring our guides on studio apartment layouts, compact kitchens, Living and bedroom space saving home ideas. And when you are ready to compare specific products and space-saving solutions, visit the Josiah Digital Hub Product Index.